
DOCUMENTATION
Get Started
WordPress installation
Weberall requirements
We recommend the following settings:
WordPress latest version
PHP version 7.3 or higher
MySQL version 5.6 or higher OR MariaDB version 10.0 or higher
Installation and Setting up
In this section we will be able to learn how to setup our website from downloading the theme to loading demo data and update it according to our requirements.
Download theme
Login to your themeforest account and go to Downloads.
Click Download button next to the theme, select the option “Installable WordPress file only”, that is your theme.zip file. If you download “All files & documentation” zip file then extract the zip file and locate the theme.zip file which is your installable file, the name theme.zip will be different for each theme. The “All files & documentation” zip file includes documentation, licensing, XML import, theme.zip and theme-child.zip files.
Install theme
1. Install theme via WordPress
Login to your wordpress website.
Go to Appearance > themes
Click Add New button.
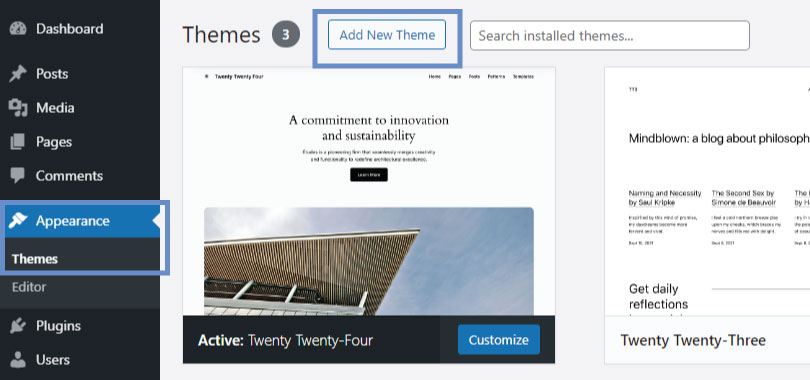
Click Upload Theme button.
Click Choose File button to upload the installable theme.zip file. The theme.zip file name will be different for each theme. Select the installable theme.zip file in the Open window and click Open button. In case you downloaded “All files & documentation” zip file, unzip it and upload the theme.zip file located in the “All files & documentation” folder.
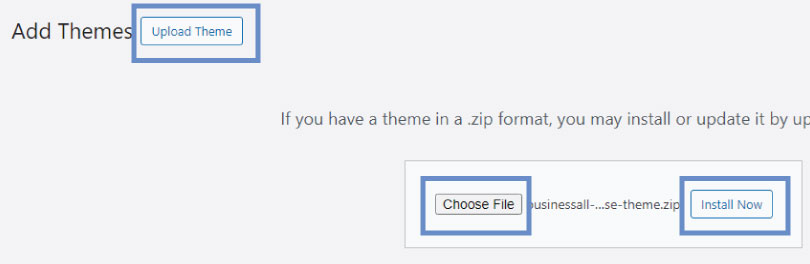
Once the theme has been installed successfully, click Activate link.
2. Install theme via FTP
Connect to your website hosting space using FileZilla or any other FTP software. Your hosting provider can help you with this if you are not able to connect.
Unzip theme.zip file, upload the unzipped folder to your web hosting space /wp-content/themes. In case you downloaded “All files & documentation” zip file, unzip it and then unzip theme.zip file and upload the theme to your web hosting space /wp-content/themes.
Go to your WordPress admin panel then go to Appearance > themes
You will be able to see your theme in the themes list, click Activate link for this theme.
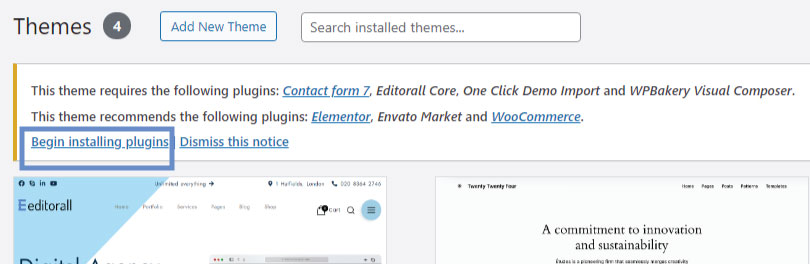
Install required plugins
Click “Begin installing plugins” link in the required plugins message at the top of admin panel. Note! must install WPBakery plugin even if you are using Elementor page builder, Weberall website builder uses WPBakery as its base for all the Weberall Builders to build your website from header to footer, these builders are but not limited to Header builder, Menu builder, Archive builder etc.
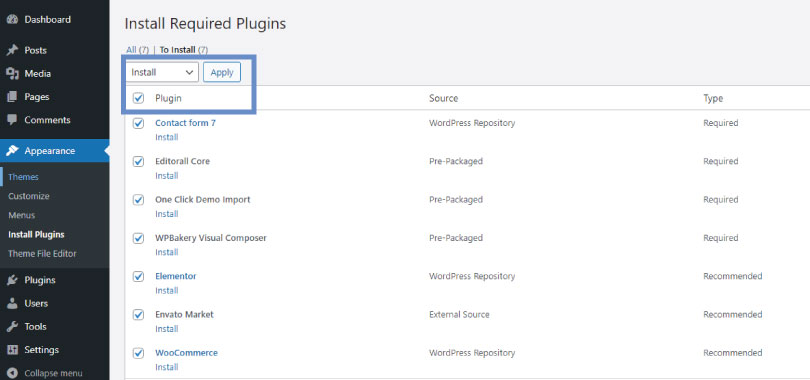
Tick the checkboxes next to all plugins and select “Install” from the “Bulk actions” dropdown and click Apply.
Import demo data
In this section you will be able to learn how to import WEBERALL OPTIONS, CUSTOMIZER OPTSIONS and DEMO CONTENT.
Go to your WordPress admin panel then go to Weberall Options > Import Demo Data
IMPORTANT: If you already imported a demo, then don’t import another demo as this will duplicate all your pages and posts, rather you can change your home page to the demo you wish as all the home pages are imported with each demo. To change home page go to Settings > Reading then change Homepage.
On the “One Click Demo Import” page you will be able to see different demos for Elementor and WPBakery.
Click “Import Demo” button for the demo you would like to install, check to import the right demo either Elementor or WPBakery which ever page builder you would like to use.
On the next page click “Continue & Import” button without selecting extra plugins. Wait until the demo is fully loaded, do not close or navigate away from this tab as it will take a few minutes depending on your hosting performance. You will get a message that the demo is loaded.
Change permalinks to “Post name” from your dashboard, navigate to Settings > Permalinks
1. Changing demo
If you already imported a demo, then don’t import another demo as this will duplicate all your pages and posts, rather you can change your home page to the demo you wish as all the home pages are imported with each demo. To change home page go to Settings > Reading then change Homepage.
2. Adding or changing inner pages
2.1 Change page content
To change a page content you load the page in its relevant page builder such as Elementor or WPBakery and start editing the page and save changes.
Elementor pages can be edited by clicking “Edit with Elementor” link at the top of the page/post. If you don’t see this link that means this page is not created using Elementor page builder.
WPBakery pages can be edited by clicking “Edit with WPBakery Page Builder” link at the top of the page/post. If you don’t see this link that means this page is not created using WPBakery page builder.
2.2 Add new page
To add a new page, click “+ New” and select page from your website frontend or Pages > Add New in your dashboard. Give the page a Title and click Publish button and once the page is created then you click either “Edit with Elementor” button or “WPBakery Page Builder” button and start adding content and click the Update button to update your content.
Weberall Options
Weberall has control on almost everything. It uses Weberall Options for templates, it uses Customizer for logo, Custom CSS and SEO options, and it uses Global Styles (Weberall Blocks with Global Styles category) for all our website styles from website width to each element styles. Custom JavaScript can be applied at WPBakery Page Builder -> Custom JS tab.
1. General
Go to your dashboard Weberall Options > General. Here you can change your website colors, to override these colors for a specific page or a block of pages you can use Global Styles (Weberall Blocks with Global Styles category).
2. Templates
Here you can set all your templates, from Global Styles, Default Template to Single Portfolio Template and from Blog Template to Shop Template.
Go to your dashboard Weberall Options > Templates
If you would like to change some global styles for single post page, keep the default Global Styles on the Templates options page as it is and change the “Single Post Template (is_single)” template or it would be best to change “Content Section” for “Single Post Template (is_single)”. Follow all the following steps.
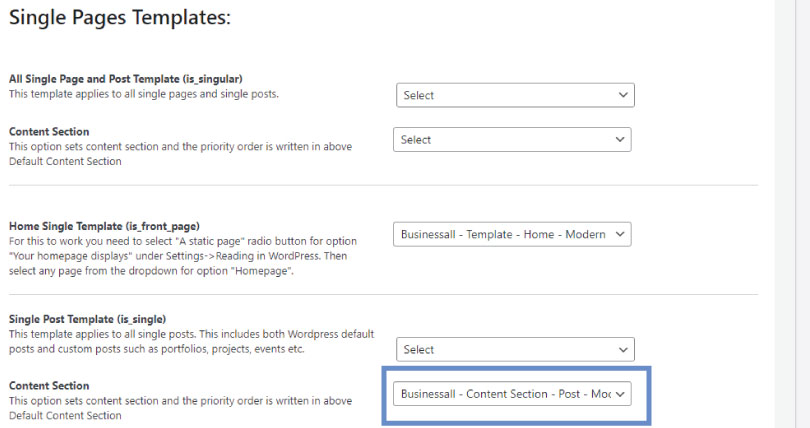
Once you change the “Content Section” then load that content section in WPBakery frontend editor you selected above and drop a Global Styles WPBakery element and select your desired Global Styles and save changes. You should make your changes in your desired Global Styles (Weberall Block) to see the changes.
3. Maintenance Mode
To apply maintenance mode, go to Weberall Options > Maintenance Mode and change the status of the Maintenance Mode toggle button from OFF to ON and select a template from the Maintenance Template dropdown to activate the maintenance mode.
4. Customizer
To change website logo, in your dashboard navigate to Appearance > Customize > Site Identity and upload your Logo here which can be used by dropping a Logo a WPBakery element in your Default Template (Weberall Block) or any other template.
You can also change your Site Icon (favicon) in your dashboard Appearance > Customize > Site Identity.
Weberall Builders and Weberall Blocks
1. Create Weberall Blocks (Template, Header, Footer and all Sections)
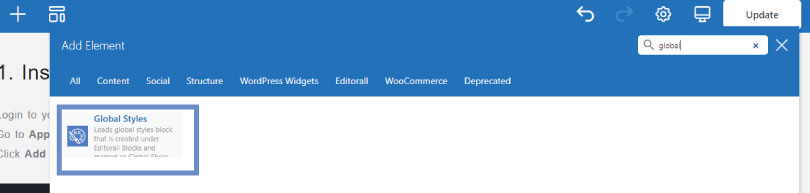
Weberall has builders for everything from header to footer. Builders for Templates, Title Sections, Headers, Footers, Content Sections, Global Styles, Listing/Archive/Related for posts/products/portfolio, Menus, Submenus, Next Posts, Previous Posts, Sections.
In your dashboard, navigate to Weberall Blocks > Add New Weberall Block
Give a title to the block, select the right category and click Publish button.
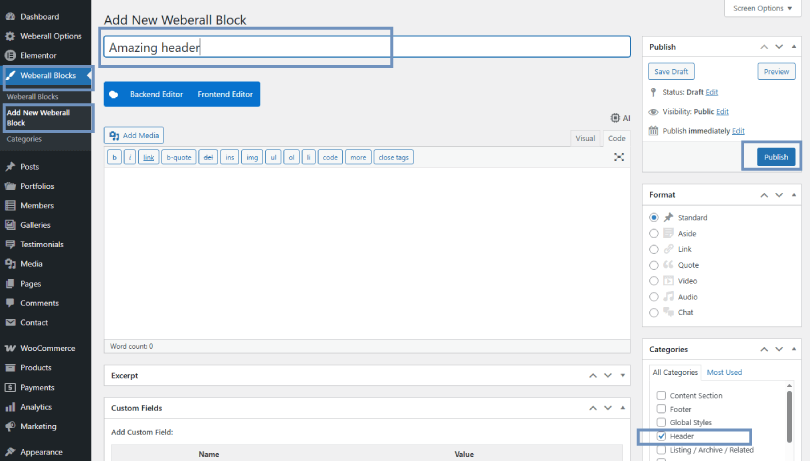
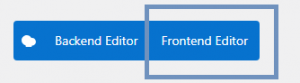
Once the block has been created then click the WPbakery “Frontend Editor” button.
Add content using advanced builder elements, design and click Update button.
Click the 3 dots ⋮ next to the Update button and click ‘View Page’ to preview.
Once your block is ready to use then you can use Template and Content Section in your dashboard, navigate to Weberall Options > Templates as explained in the Template section or you can use it for individual pages/posts/custom-post-types by clicking Edit page/post at the top of your website frontend.
The rest of the blocks can be used by either Template (Weberall Block) or Content Section (Weberall Block) or it can be dropped on any Weberall Block or any page/post using the WPBakery drag and drop functionality.
This is how to use these blocks, open your Template in edit mode by going to your home page and click green ‘Template’ button, this button will appear when you hover your mouse on the website. (Note: if you used different Templates for Home page and the rest of the website as the Default Template then you can open any page other than Home page and click the green ‘Template’ button to open the Default Template.)
In this Template click the edit button of the ‘Header’ element and change the header, click ‘Save changes’ button for this element. For footer click the edit button of the ‘Footer’ element, the same procedure is applied for all types of blocks except ‘Template’ blocks. (Note: the ‘Template’ blocks can be changed in your dashboard > Weberall Options > Templates.)
Click ‘Update’ button to update the block, check your changes by previewing Home or any other page.
2. Edit Weberall Blocks (Template, Header, Footer and all Sections)
In your dashboard, click Weberall Blocks
Open any block in edit mode by clicking ‘Edit with WPBakery Page Builder’ for a specific block. Note: ‘Global Styles’ block can only be opened through this method. The second method is that you can also open any block by hovering your mouse on top of any area of the website and it will show a green button with a pen for that section such as Template, Header, Footer, Section etc., click that button to open the block in edit mode, this method will work only when you are logged in.
Make your changes and click ‘Update’ button, click the 3 dots ⋮ and click ‘View Page’ to preview.
Updating theme
IMPORTANT: Always backup your website’s all files and database before updating the theme to avoid any issues.
Download the latest version of the theme from themeforest and replace all the files in your theme folder and do not replace child theme files.
Update the Weberall Core plugin and all the plugins used by the theme.
Files from Another Server
We are using files from other servers, for example we are using Google fonts but it is not limited to. By using Google fonts, it may make your IP address visible to Google.
On This Page
Weberall requirements
Installation and Setting up
Download theme
Install theme
1. Install theme via WordPress
2. Install theme via FTP
Install required plugins
Import demo data
1. Changing demo
2. Adding or changing inner pages
2.1 Change page content
2.2 Add new page
Weberall Options
1. General
2. Templates
3. Maintenance Mode
4. Customizer
Weberall Builders and Weberall Blocks
Updating theme
Files from Another Server